 LightListManager User Guide
Light List Radar Display
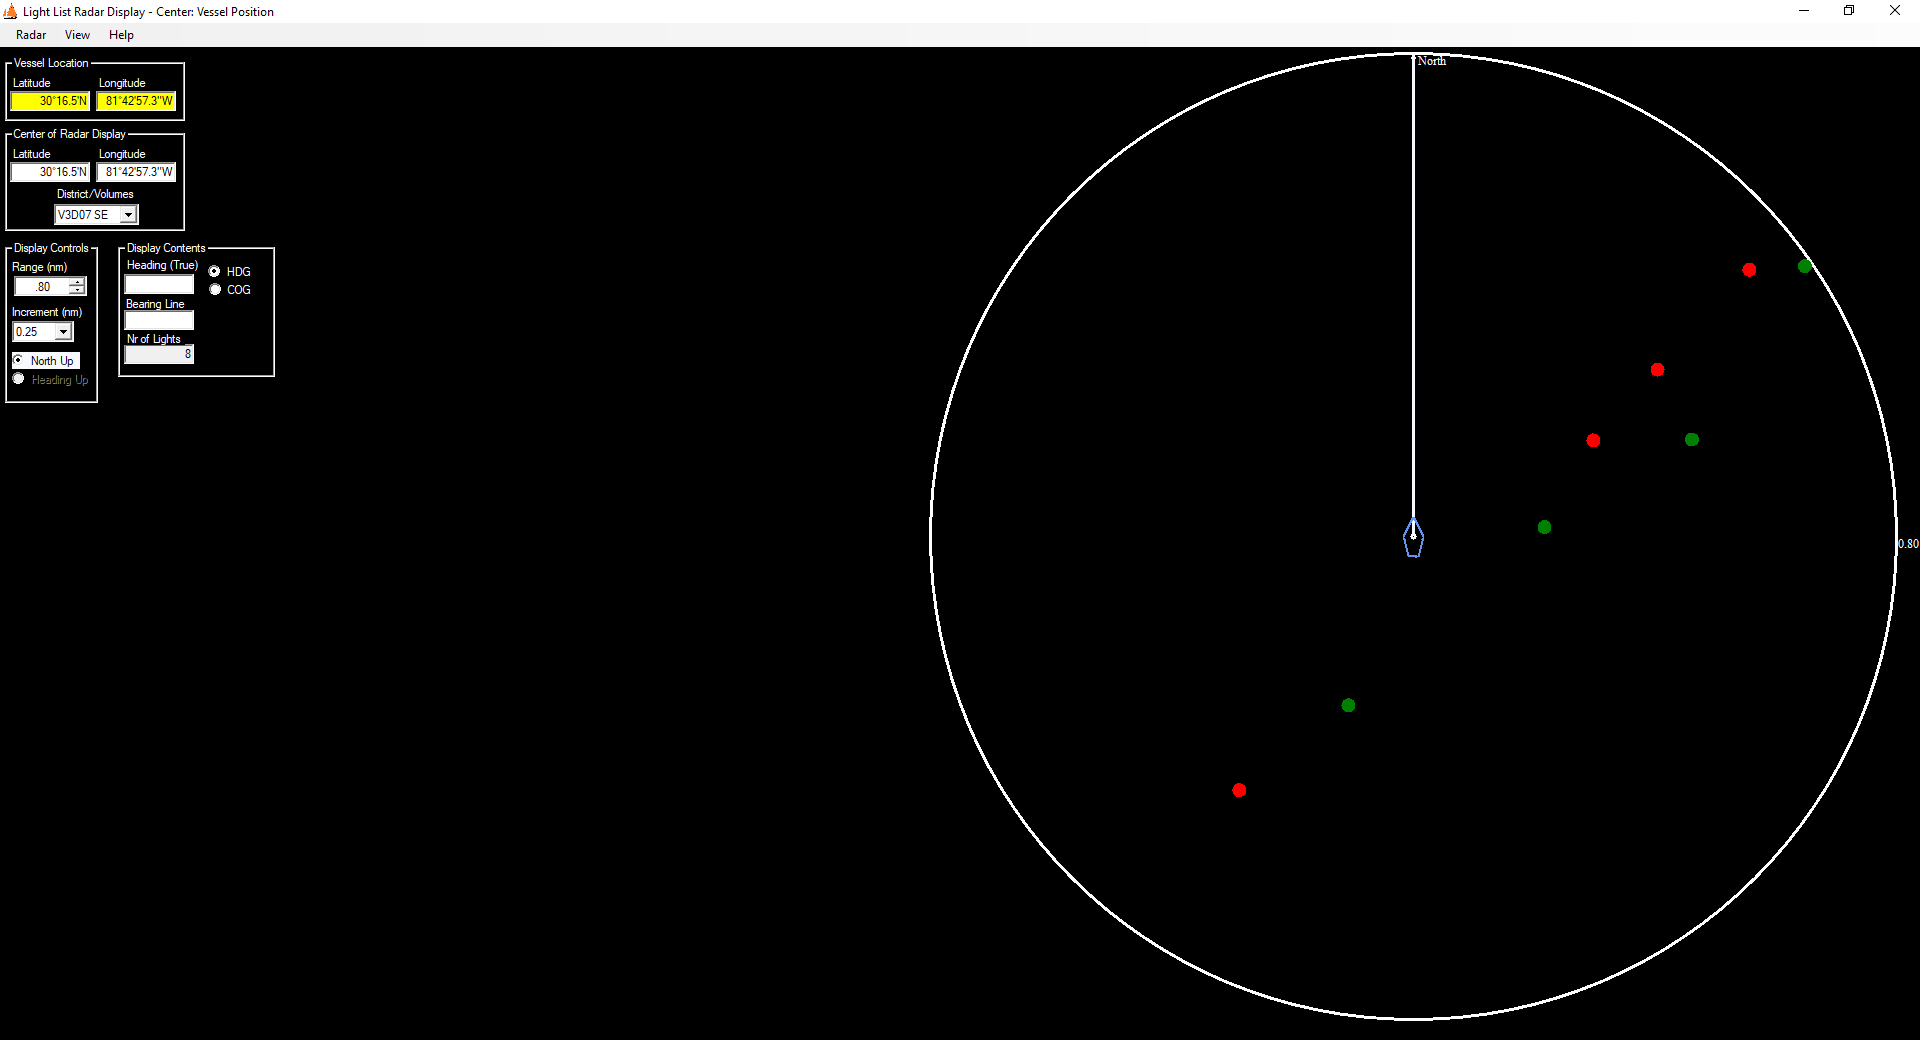
LightListManager provides a graphical depiction of the Light List entries in a radar-like display (Fig. 1). The purpose of this form is to display the location of navaids relative to the vessel's position. This form is activated by clicking on the "Light Lists>Light List Radar" menu item on the Main form. The center of the circle on the right side of the radar display form is the location defined by the "Center of Display" text boxes in the upper left corner of the form. The center is normally the same as that in the "Vessel Location" Text boxes. The values in the "Center of Display" textboxes are controlled by the program and may be used to off-set the display from the vessel position.
There are two ways to set the vessel location.
- Manually enter the latitude and longitude in the vesssel location boxes.
- Activate a NMEA 183 input and allow a GPS to set the location
The first method is shown in Fig. 1. I have entered the coordinates of my location in Jacksonville, FL and the display shows most of the Ortega River buoys (on the right side of the display). The white vertical line points north, the default orientation for the display. The range covered by the radar display is controlled by the Up/Down button on the left side of the form (In the "Display Controls" panel, currently set to 0.80 nm). In the "Center of Display" panel is the drop down list of Volume/District Light Lists that are in use on the form. In this case, the V3D07 Light List is in use because I have entered a Florida location. The Light Lists are automatically loaded based on the center position and the range of the display. If I were to expand the range to several hundred miles, the V04D08 and V02D05 lists would be loaded. The program loads lists based on the smallest rectangle that encompasses the radar display area.
The background of text boxes containing the vessel location is yellow, indicating the position has not been established by a GPS. The orientation of the display can be changed from "North Up" to either "Heading (HDG) Up" or "Course Over Ground (COG) Up by setting a HDG or COG value in the "Display Contents" text box either manually or from a NMEA 183 input, then clicking on the HDG/COG Up radio button in the "Display Controls" panel. There are additonal display controls under the "View" menu item at the top of the form
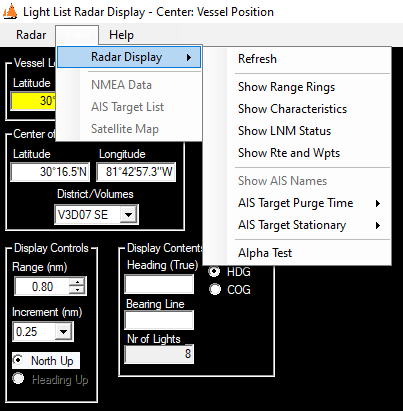
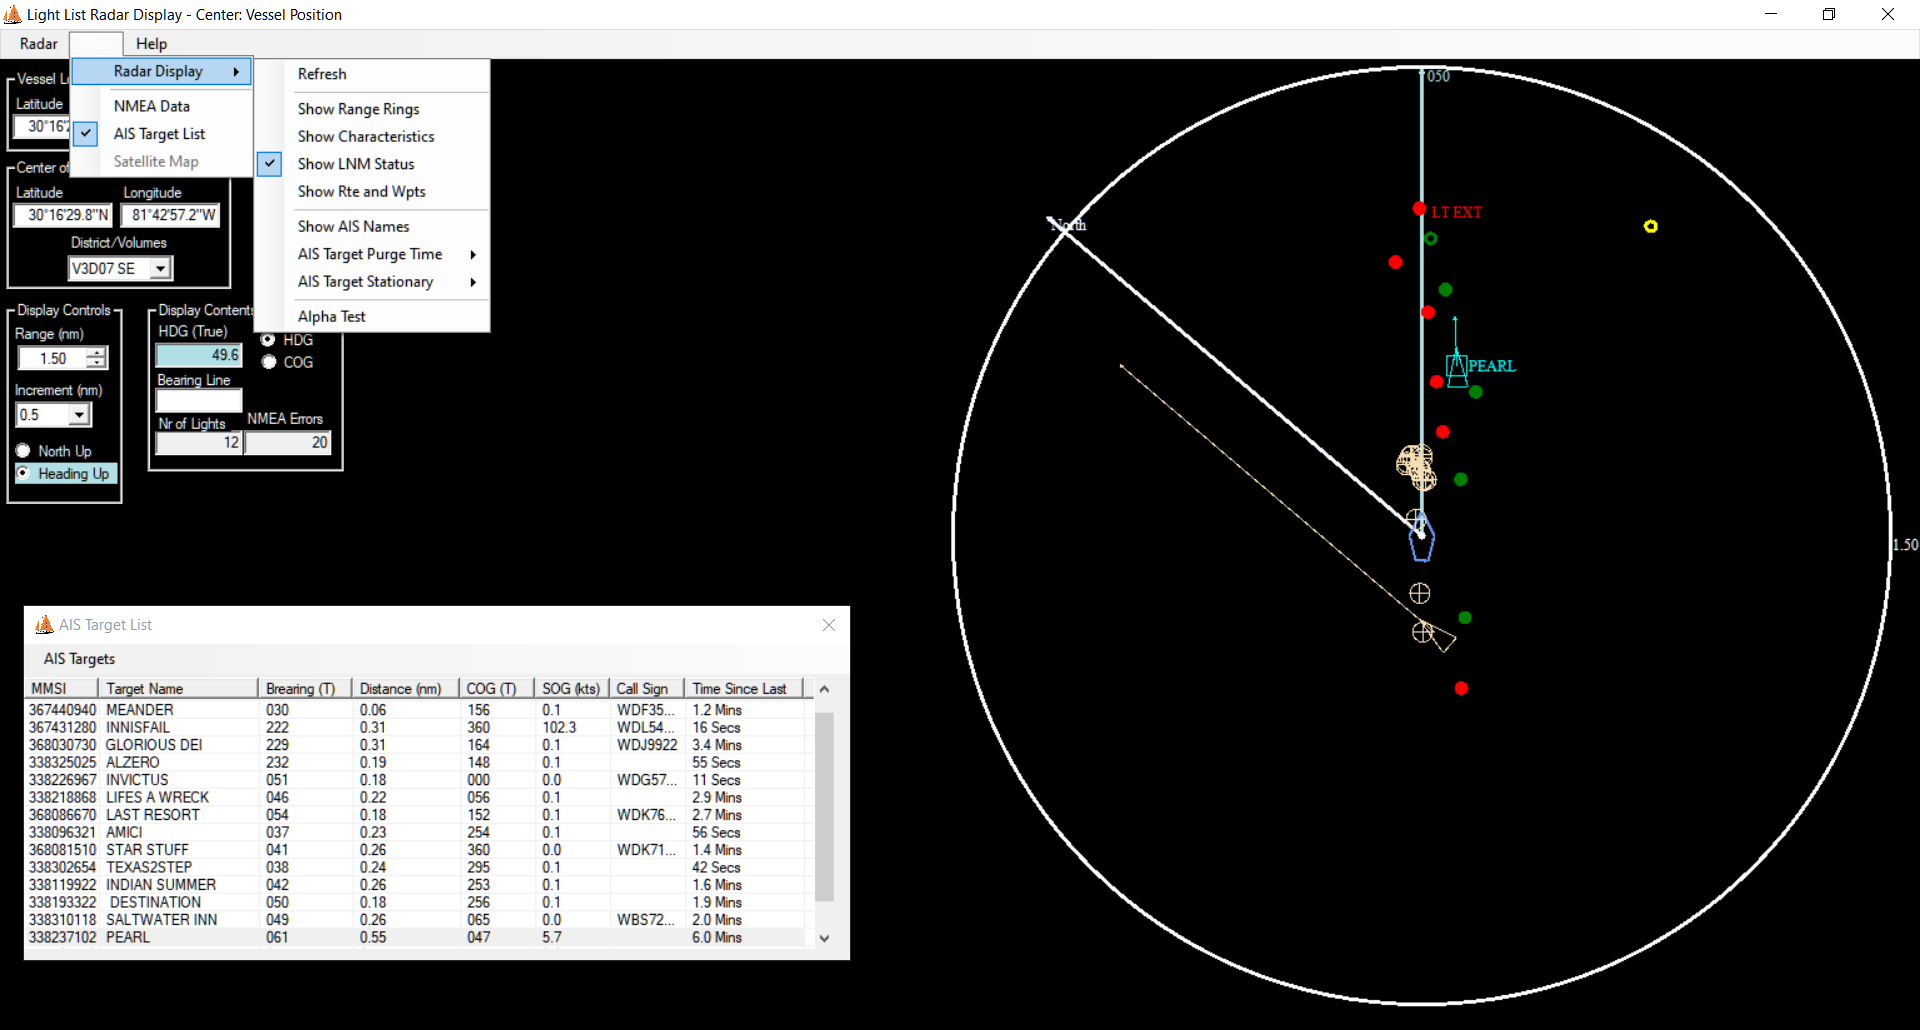
Fig. 2 shows the menu items that control the display. These items include:
- Show Range Rings. Draw rings within the display at a selectable increment
- Show Navaid Characteristics. Display the light characteristic next to the navaid icon.
- Show Local Notice to Mariners (LNM) Status for each Navaid
- Show Waypoints and Routes. If any wpt or rte messages are received from the NMEA 183 input.
- Show the Names of AIS Targets. Either ship name or its MMSI
- Set the Purge Time for AIS Targets. Set the time since last message at which an AIS targest is deemed lost and should be removed from the display
- Define the Stationary Status for AIS Targets. Set the Speed Over Ground (SOG) value below which a vessel is to be considered stationary (not underway)
The "Alpha Test" menu item is used to debug portions of the program in an operational environment and is normally not enabled.
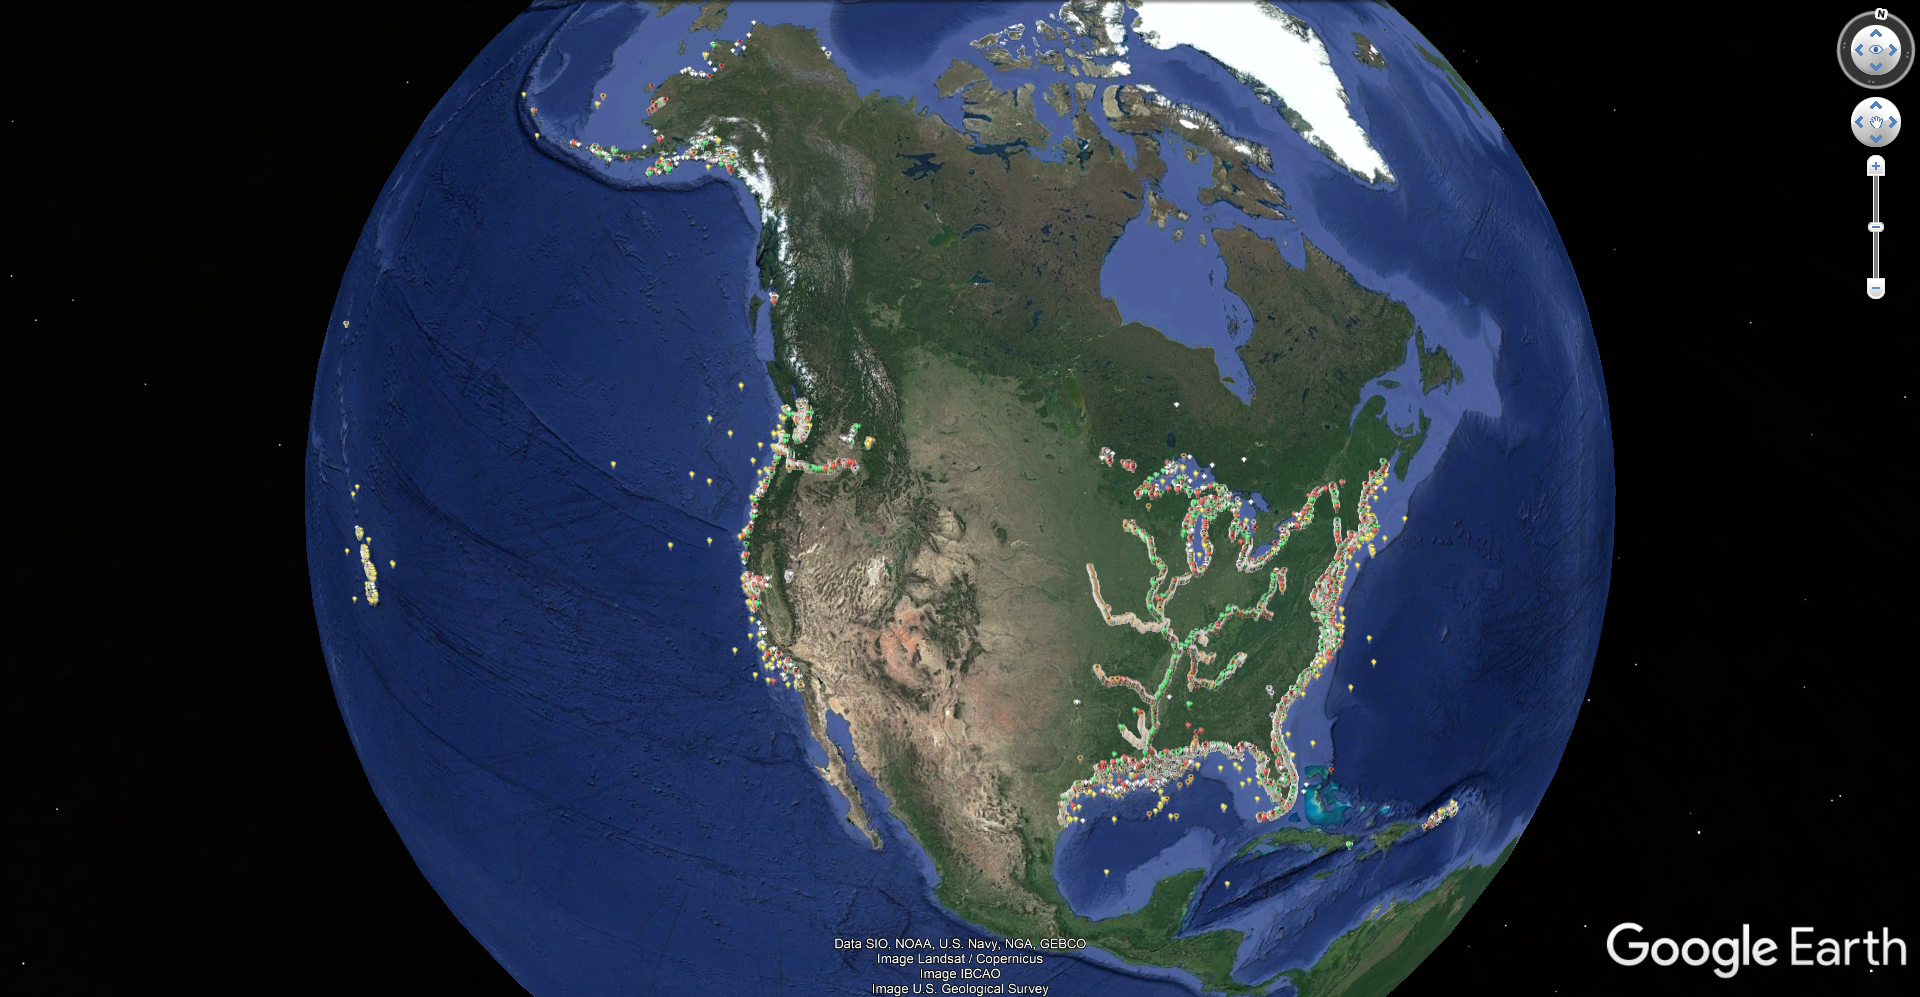
With earlier releases of the program I allowed a range value of up to 500nm. This has no real value, and it does bog down the processing in this form. With version 1.6.4.9 the maximum range allowed has been reduce to 100nm and 25nm when NMEA 183 input is active. These values are well beyond any useful range. The main use of much larger ranges was the Gee-Whiz of seeing the entire state of Florida outlined by the light list plot. You can still get a Gee-Whiz program output by exporting the entire light list to Google Earth as shown in the screen capture in Figure 3.
Icons for Lights and Marks
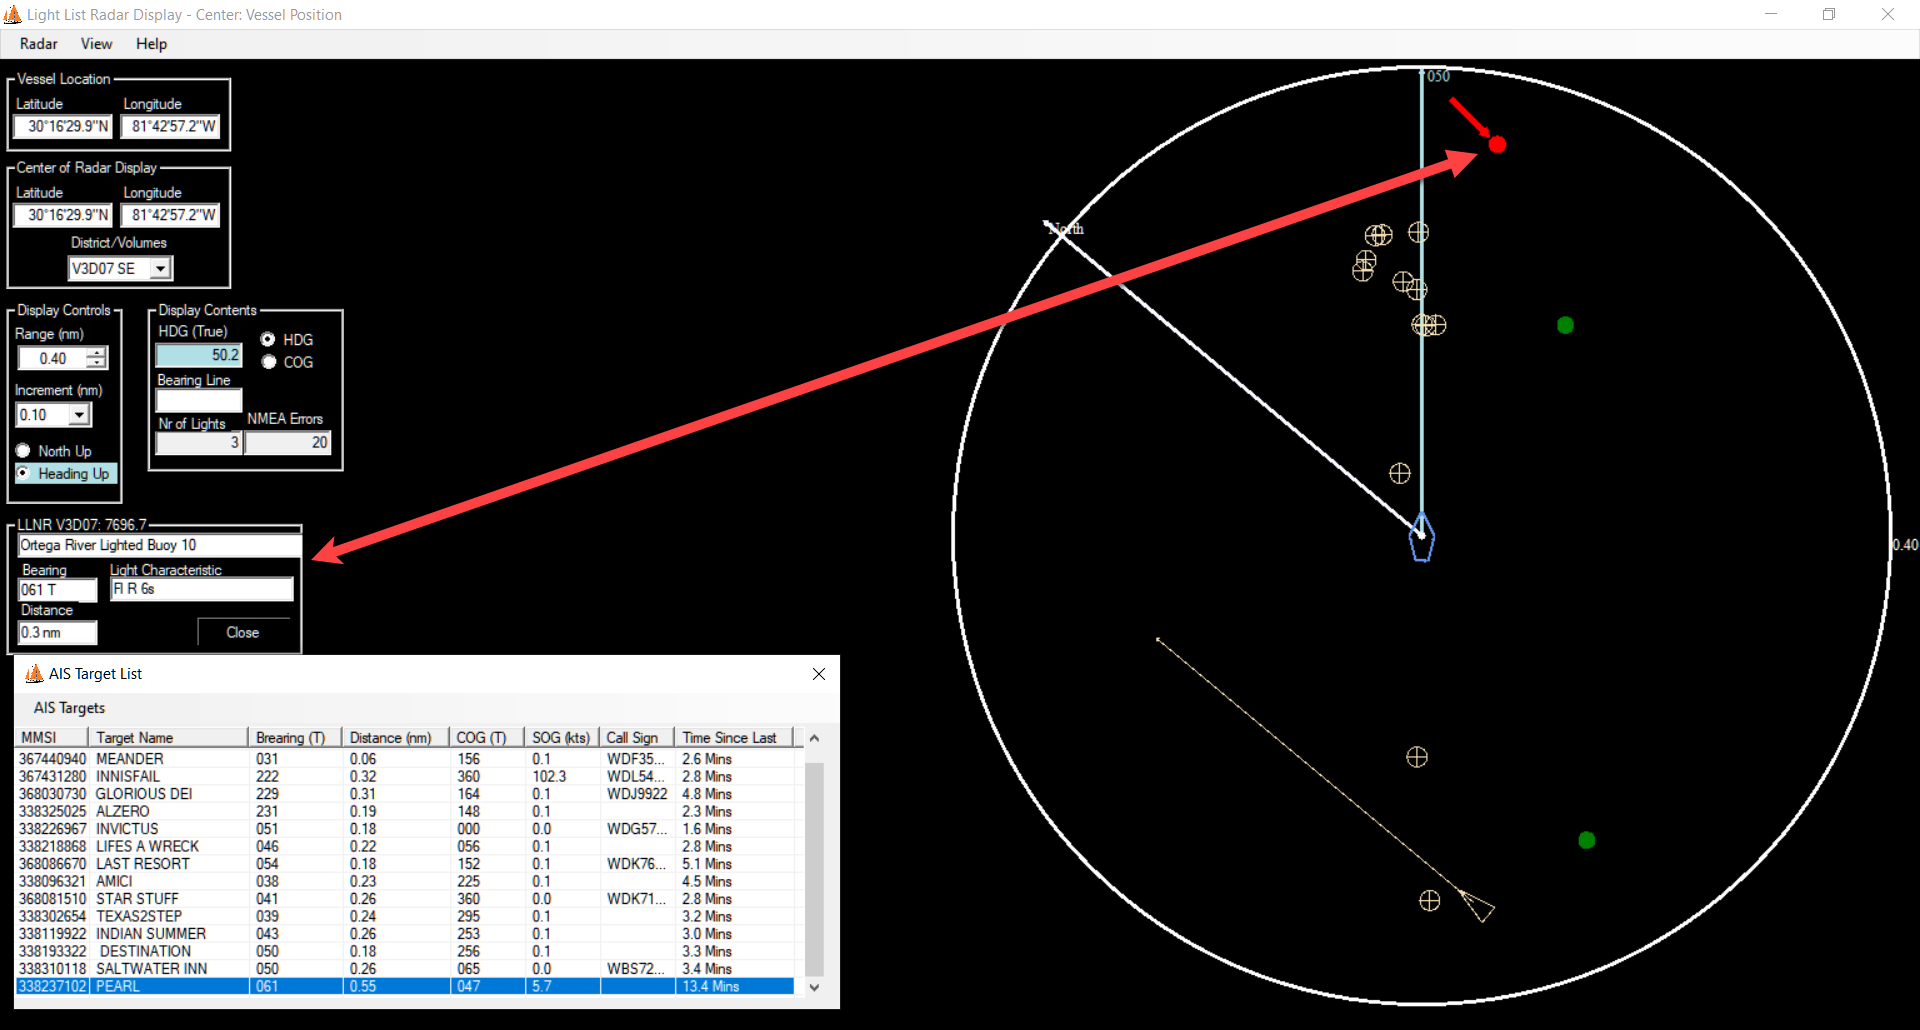
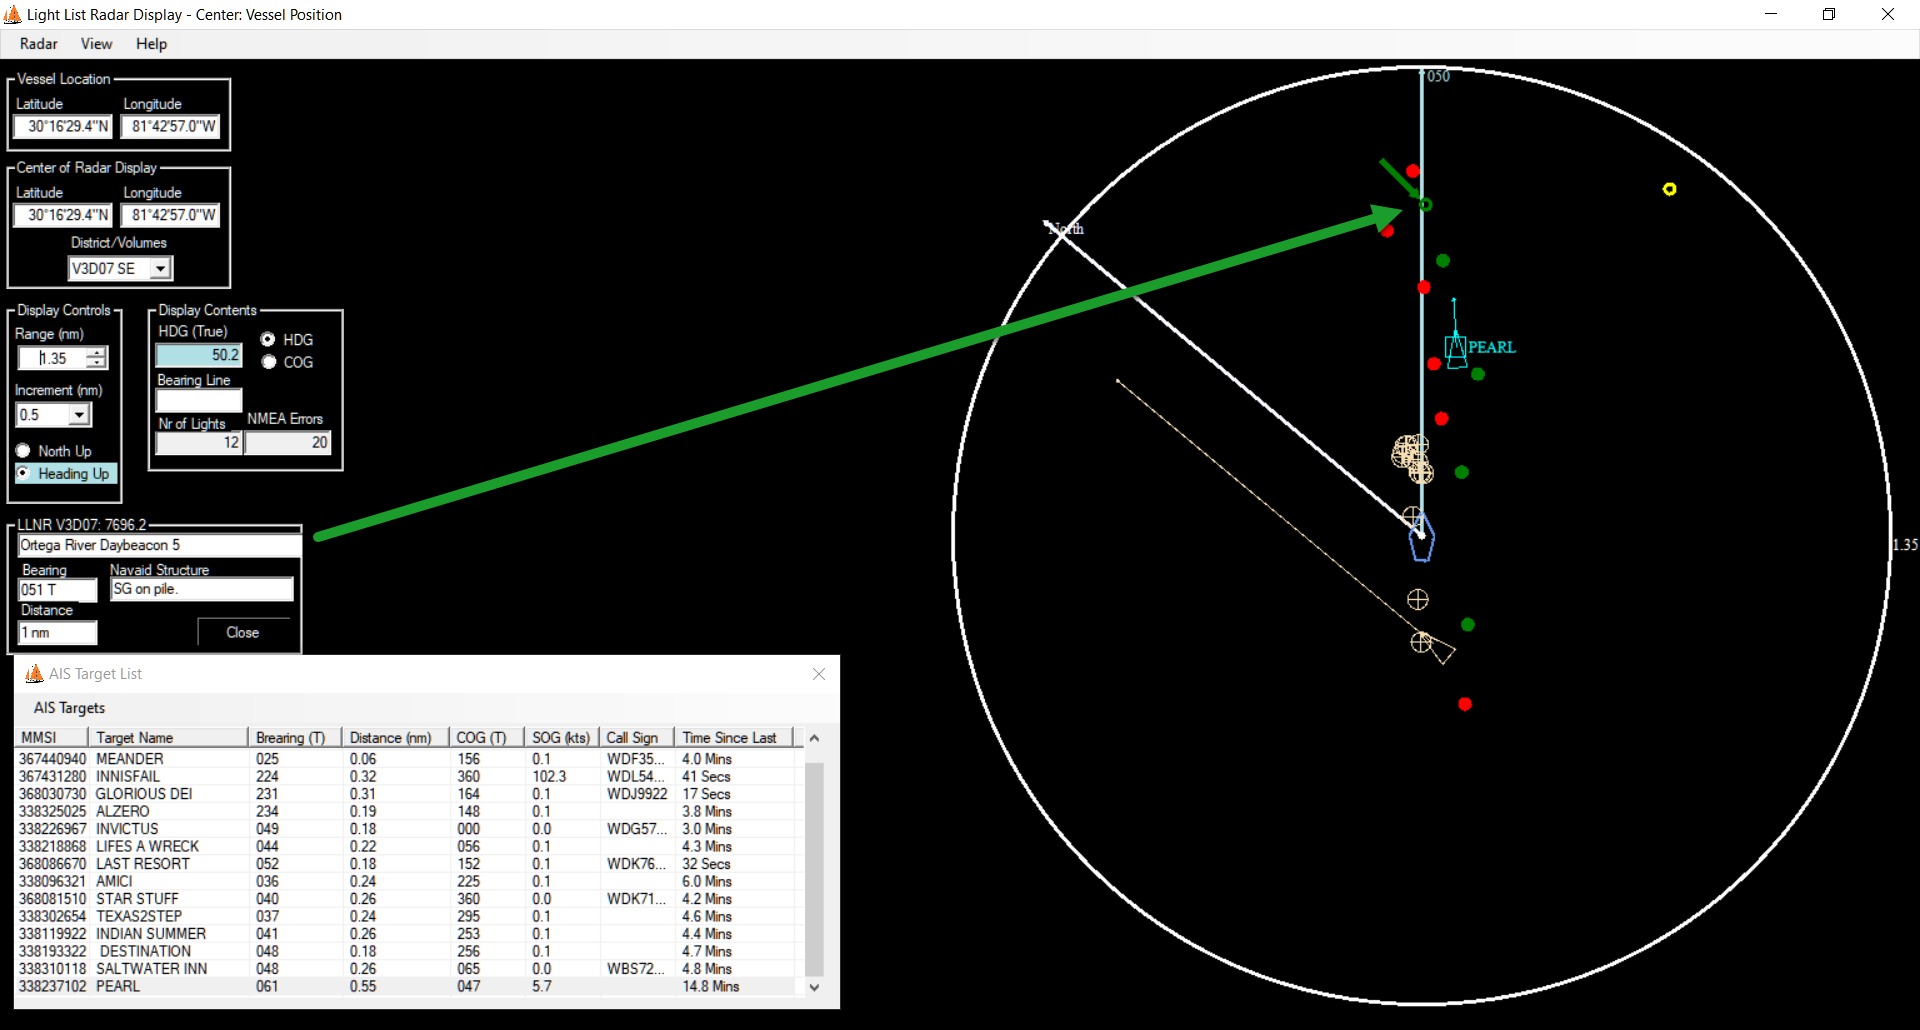
Once a valid position has been entered into the vessel position boxes and the form has been zoomed out sufficiently you will see lights and marks displayed as circular icons, color coded to that of the light or mark (red, green, yellow or white). Multi-colored lights (e.g. "RW") will be displayed in the first color. Lighted marks are solid-filled circles, and day marks are hollow circles. If you left-click on one of the mark icons a box will appear on the left side of the form to provide information on the mark. Fig. 4 and 5 show the info display for lighted and unlighted marks, respectively. In addition to the text information, the display highlights the navaid that was clicked with an arrow that is color-coded to that of the navaid. The mark info displayed includes the bearing and distance from the current ship posiiton to the mark. If the vessel is underway and NMEA 183 input is active, those values will be updated with each change in the vessel's position. If the clicked mark is lighted the characteristic of the light is shown. If the mark is unlighted the structure description is shown. Clicking the "Close" button in mark info section will close that panel and remove the highlight from the selected mark.
If you right-click on any of the icons the Light Details form (as described in the Basic Stuff, Light List Data Display) for the mark will be opened.
Showing LNM Status and Characteristic
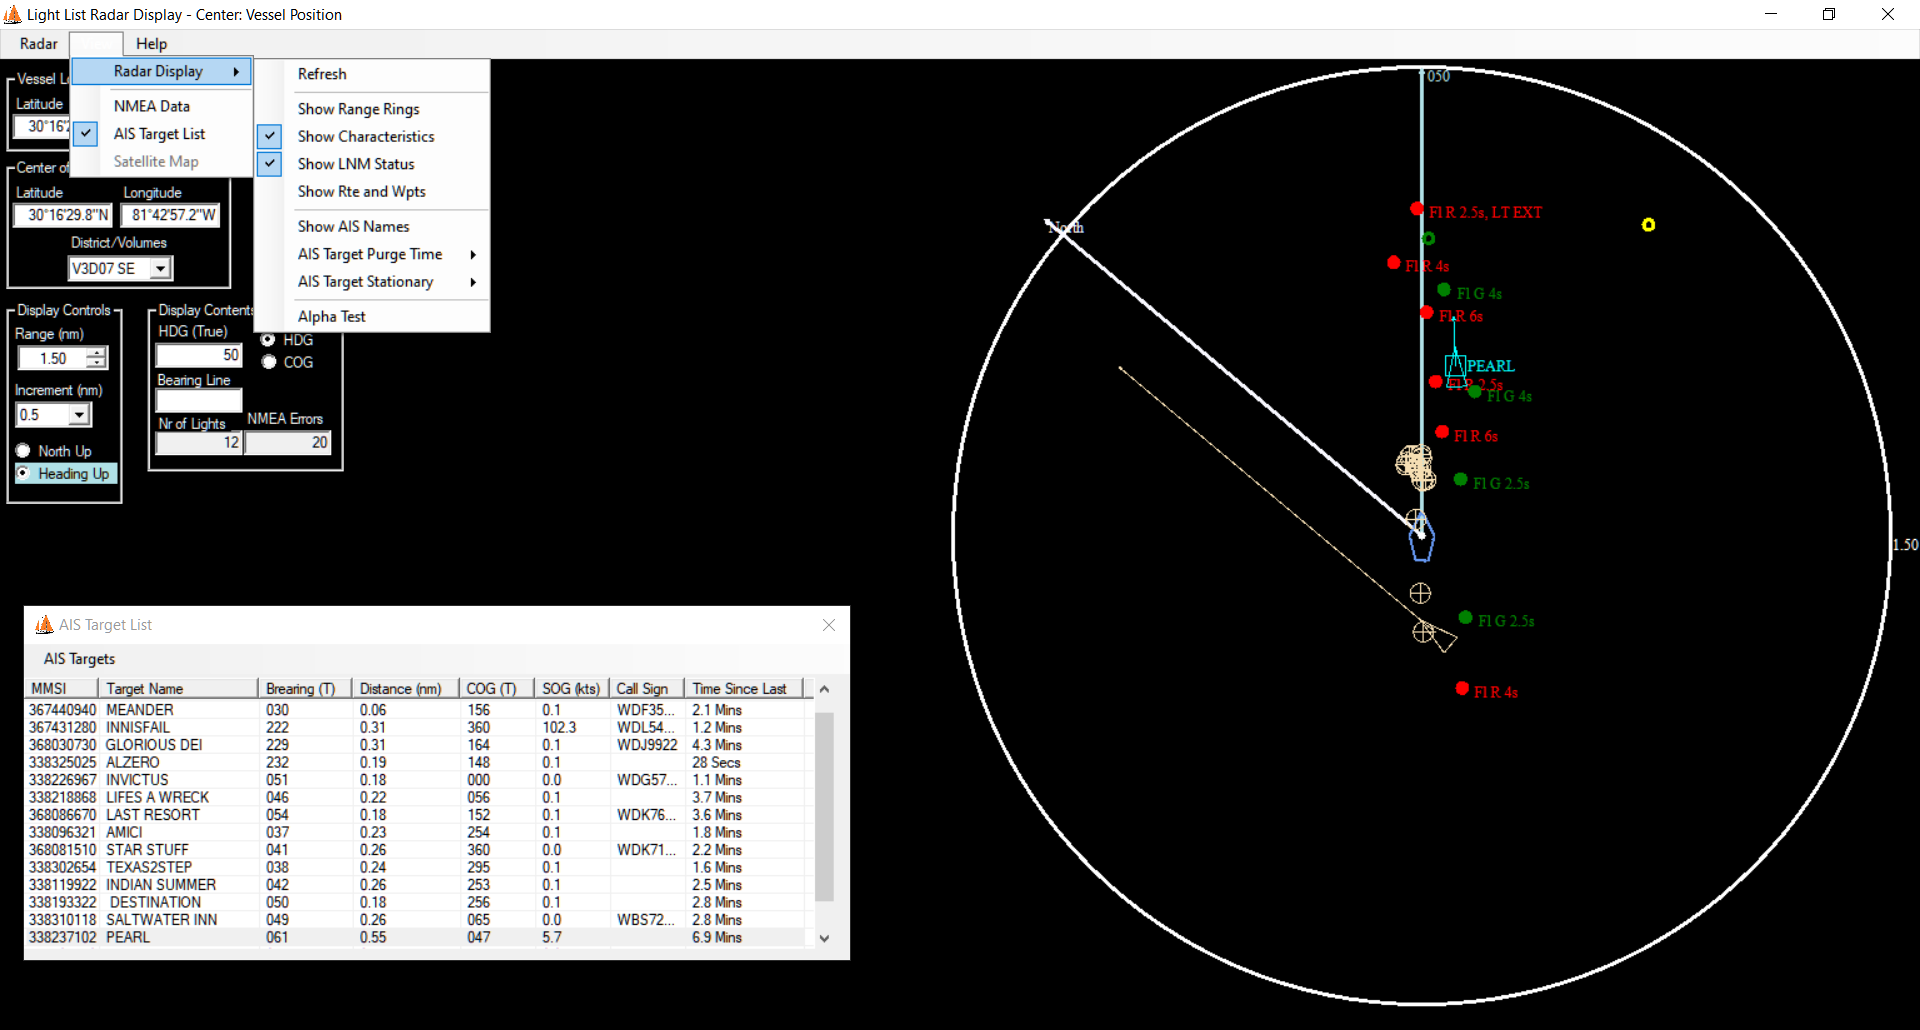
The Local Notice to Mariners (LNM) status for each light can be displayed on the radar form. The LNM status can be turned on or off from the View menu as shown in Fig. 2, above
In Figure 6 the LNM display option has been turned on and one of the lights in the display shows a status of "LT EXT" (Light Extinguished). So if I were using the program to assist in a night departure from the Ortega River I would know to not look for this light. Actually all of the lights on display have been extinguished since Hurricane Irma. These are "PA" (Private Administer) lights, for which the LNM data is not always reliable. LNM data for "FD" (Federal Administer) lights is generally more reliable.
Figure 7 shows what happens when both the characteristic and LNM status displays are turned on. The text clutter makes this display less than useful for navigation, so I would normally have only one of them turned on.
The next subsection covers using NMEA input to set the position of the radar display. Let the cursor hover over the "Radar Display" entry in the navigation panel above to see links to the subsection topics.